Jul 29, 2011

Happy Anniversary!


Today is my anniversary and this is the card I made for my husband.  I tried not to make it too girly and I'm not too sure if I succeeded or not but I really like it.  I made the quote card by stamping an image on white cardstock in Embossing ink and then loaded it up with black glitter Zing Embossing Powder.  I love this stuff!  It's so easy to work with and always heats up and melts perfectly!  Then using my Nestabilities Scalloped Ovals dies I cut it out and then a slightly larger version in black as a mat.  Really makes a statement doesn't it!  I also ruffled the grosgrain ribbon myself by doing a simple running stitch in white embroidery floss and then cinched it up and tied the ends.  Pretty easy! 

Supplies: Patterned Paper: American Crafts - Metrolitan Collection; Cardstock: The Paper Company and Bazzills; Embellishments:American Crafts - Zing Embossing Powder in Black Glitter Finish, Ribbon, Embroidery Floss and Pins; Inks: Creative Memories Corner Rounder, Nestabilities Dies - Scalloped Ovals and Labels 4; Tools: Cuttlebug.

Jul 23, 2011

Fire Bug


This layout started with me wanting to use several of the American Crafts Campy Trails Decorative Tags and went from there.  I don't usually have a lot of white space on layouts so this page ended up being quite a challenge for me.  I love how it turned out but I tell you there were many times when I kept trying to add something (a brad, a stamp, another tag ...) to the upper left corner.  But I stuck with my original plan and I was able to complete it without adding anything!


Aren't those tags the cutest!  I love them!  The work perfectly with the whole collection with co-oridnating but different patterns, plus they have some with cute sayings on them!  And the twine bows add a rugged cuteness if I do say so myself.


I had more photos to go on this layout but really they were all of Steve starting a fire. I picked my favorites and then decided to put the embossed cardstock in the middle to break up the photos, to give the eyes a rest, and to give me somewhere to put my title and journalling.  I think it turned out pretty good seeing as that much white space was a real challenge for me!

Supplies: Patterned Paper: American Crafts - Campy Trails Collection; Cardstock: Bazzills; Alphabet Stickers: Amercian Crafts - Thickers; Embellishments: American Crafts - Campy Trails Decorative Tags, American Crafts - Campy Trails Fabric Brads, Bo Bunny - Roughin It Layer Cardstock Stickers, Drywall Tape, and Twine; Tools: CuttleBug, Tim Holtz Wood Grain Embossing Folder.

Jul 22, 2011

Majestic

While we camping this past May Long, we took a quick trip into Canmore, a near by town, to get some supplies. It's like this at the start of every camping season! There is always something we forgot or need and this trip was no different. Our little dog need a bathroom break so Steve pulled off the road onto this service road for the Dam and the views there were amazing!


I really loved this picture of the mountains and the lake.  The ice was still on the shoreline and the mountains were reflecting on the lake.  It felt like a scene out of a movie!  So when I was printing the photos, I knew I really wanted this photo to be the focus so I took a page out of my freind Haley's book and printed it in 11x14 format.  Really draws your attention doesn't it!

 
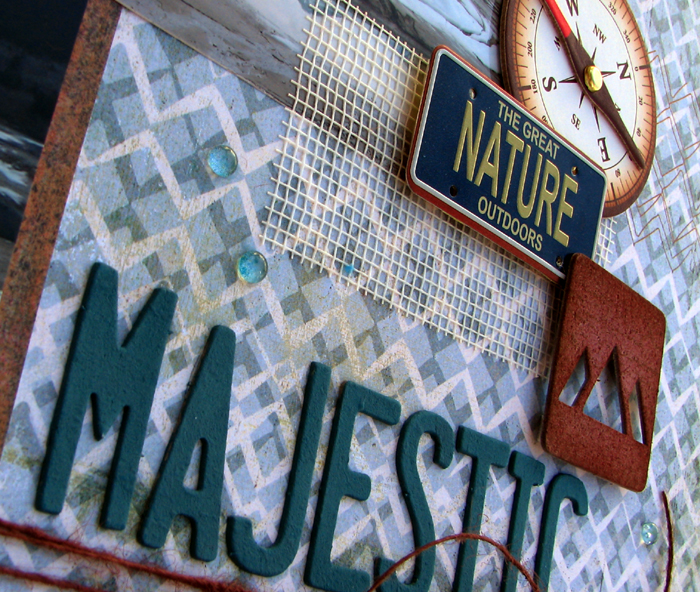
I picked up this grungeboard set design by Tim Holtz called Iconic and have been hoarding it for quite awhile.  I pulled it out because I didn't have any Thickers that really went with the colors of this layout, shocking I know seen as I think I own almost every set of Thickers!  I'm a bit addicted ... I admit it.  Anyways, because the letters were grungeboard, meaning naked, I painted them using my Memory Makers paints mixing 3 different colors for the perfect match.  After they dried, I roughed them up a bit with a sanding block.  To my surprise I also found the cute little mountain range in the same grungeboard set so I decided to ink it up and use it too!  See that cool mesh material, I bet you won't guess what it is!  It's actually drywall tape found at any hardware store.  Cool isn't it!  I love the stuff and use it all the time.  In fact, I am already on my second roll of it!


I have been going through this phase where I need to do a little something extra to almost all the embellishments on my layouts.  It's kind of my way of making it my own.  The chipboad circle was perfect for my layout but I felt it needed a little more dimension so I added some glossy accents to give it that epoxy look in the center.  Also, my journalling die cut had flourished border that I found too fancy for the layout so I covered it with some ribbon that went better with my layout.  Now both pieces fit perfectly with my layout and are unique too!

Supplies: Patterned Paper: Basic Grey - Archaic Collection; Cardstock: Bazzills; Alphabet Stickers: Tim Holtz Gurngeboard - Iconic; Embellishments: Basic Grey - Archaic Chipboard, Tim Holtz Gurngeboard - Iconic, Making Meories Paint, Ribbon, Glass Beads, Drywall Tape, Karen Foster License Plates, and GCD Studios - The Great Outdoors Chipboard; Tools: Sanding Block.

Jul 20, 2011

Some People Read, I Sketch

Some people like to read in their spare time (when they're not scrapping of course!). I have never been a big reader. Don't get me wrong I like to read but I don't usually have the time to sit still long enough to read a chapter let alone a whole book. And by the time I pick it up again, I have forgotten everything I had read up to that point. It's very frustrating! I have been reading the same book for the last year and I think I have decided to give up on it as it is obviously not interesting enough for me to want to read. So what do I do in my spare time you ask? It's simple really. I sketch. I'm not saying all ideas are originally mine or that there is anything incredible in here but I like to get them down none the less. I find it relaxing, plus it is totally portable too! I have done them at work on my lunch break, sitting at the service department waiting for my car, even out camping when we have a quiet moment.


I have broken my sketches into two types, 1 pagers and 2 pagers and each have their own book.  In fact I am onto my second 1 pager book as my first one is now full! I love this because when I am looking for inspiration I generally know if I am doing a 1 or 2 pager.


For those of you that know me, this part won't come as a surprise but I am a little bit particular (read anal) when I come to my sketches! I draw my sketch out in pencil first and then once I get it the way I like, I go over it with a pen and ruler (no crocked lines in these books!). I also love that they are coiled notebook (which I bought at Chapters) so that they flat on my desk when I am working.


And here they are on my shelf behind my desk with all my issues of Creating Keepsakes. It's like my little inspiration corner.

Jul 19, 2011

Rainy Day Fun!


A friend of mine, who was hosting a baby shower asked me if I could help out with the party games seeing as I was what she called the creative one.  We looked online to ideas and found this game that is basically several games all rolled into one and sounded like it would be fun.  People would break off into pairs and would basically play a game of tic tac toe, except that they had to win their turn by winning another game.  I was in charge of making these really cute tic tac toe cards and their co-ordinating pieces.  It wasn't too bad as I only had to make 10 sets.  Let me tell you my Cuttlebug sure got a workout cutting out all those felt pieces!  You could easily change this to be custom for anything.  How about a rainy day game for kids with clouds and suns as the pieces?  It's so easy to make that I bet even the kiddos would have fun making their own cards too!


For the tic tac toe lines I used grommets and embroidery floss.  Initially, I was going to stitch the lines but after considering how much stitching that would be for 10 cards, I decided this route would be a little less time consuming!  There are many options to do the lines other than stitching.  You could used adhesive backed ribbon, a line of brads, or how about if the kids are making them, they draw their own lines!


And finally I adhered an envelope to the back of each playing card to hold the pieces so that they don't get lost.

Supplies: Patterned Paper: American Crafts - Everyday Collection; Cardstock: Bazzills; Alphabet Stickers: Thickers; Embellishments: Felt, Buttons, Grommets and Embroidery Floss.

Jul 15, 2011

Acrylic Stamp Storage

For a change of pace I though I would do a post about how I store my acrylic stamps. One I think it's pretty nifty and two I am working on a wedding album for my cousin right now and I can't post any pictures until I give it to her! So for the next couple of posts my topics will still be scrapbook related but not necessarily layout related!


If you are anything like me, you have a mass amount of acrylic stamps in your stash. For the longest time I just kept them on the clear sheets they came on in a drawer. But this made using them very difficult because you had to shift through them all to find what you were looking for. Because of this I found myself using them less and less.


We were cleaning out our entertainment system when I came across some old CD cases and I thought they would be perfect for storing my acrylic stamps. So one night I sat down with a movie on and started to organize my stamp set into the CD cases. The nice thing was that I was able to use both sides of the case.


The CD cases fit perfectly into my storage cubes with enough room to store my acrylic blocks on the side.


Each case got a label saying which theme of stamps were contained within and when I put them in the drawer I grouped like themes together. This way when I now open the drawer I can quickly glance through all the labels and find the theme area I am looking for. And because the CD cases are clear I can slide each one out and quickly glance at what is inside and if it's not what I want I put it back and move to the next case. It has streamlined the search for stamps so well and I am excited about using my stamps again!

I hope you found this idea useful and if you have any neat storage ideas I would love to hear them.

Jul 14, 2011

Office Away From Home

While Steve was working on his Master's degree he always found it easier to seclude himself while working on papers and assignments. He favorite place to go was camping in the trailer. It seems a bit of an oxymoron really. Most people camp to get away from technology but not my husband. He would pack all his gear and set up in the trailer. The hum you could hear was from all the equipment and not the trailer's furnace. It worked for him and he found it easier to work without the regular distractions of home.


Because this had become a regular routine for him, I decided to take pictures so that I could document it. The layout is pretty basic as I couldn't decide whether to make it school themed or camping themed. In the end, because I did some other layouts about this particular camping trip I stuck with the camping theme. I think the title and the journalling explained how it was different from a regular camping trip and the camping definition sticker could easily be interpreted for this layout about Steve's Office Away From Home!


Supplies: Patterned Paper: My Mind's Eye - Breaking Free Collection; Cardstock: Wood Paper; Alphabet Stickers: Crate Paper and October Afternoon; Embellishments: Trees from a Cricut Cartridge, Brads, Burlap Ribbon, Camping Stickers; Tools: Cricut.

Jul 9, 2011

Finally!


I know I say this a lot but I love how this layout turned out! I love the simplicity of it! And aren't those little houses adorable, even though they were a pain (read below to find out why). I find that most of my layouts I love. I don't know why ... just do! Are you like that?


Have you ever started something you wish you hadn't. Well I did for this layout! I started with making the little house on the bottom left by hand and I thought it was just too cute! I do have a Cricut but I loaned it out to a friend so I didn't have it to make my life simple. Because I liked this one little house I thought my layout needed more so I decided to do four more. That was a lot of work with a lot of teeny tiny cuts. I don't like that much fussing for a layout but I did it anyways. And to make matters worse, I had 2 of the 4 done when I spilt my drink on them! I might have to bring back my closable containers only rule! Yes I still think they are cute but next time I will be patience and wait to get my Cricut back!

Supplies: Patterned Paper: ; Cardstock: Bazills; Alphabet Stickers: ; Embellishments: Riff Raff - Curly Tree and Pearls; Sketch: Sketches for Scrapbooking.

Jul 8, 2011

Perfect 10


Last year was our 10th Anniversary.  Now I know you must be thinking, 10th Anniversary layout about a car?  Yep, it sure is!  You see, this car is my baby.  In fact, it was purchased by my Dad when I was a baby (well technically I was 3 but close enough).  I have loved this car my entire life.  When I was little I remember telling my Dad that if I went to college that my gift should be this car.  Sure enough he remembered, and gave it to me shortly after graduation.  Now because the car is close to 30 years old, it was definitely showing its age.  For the last several years my husband and I have been slowly fixing it up, I say slowly because it's dang expensive to restore a car!  Anyways, for the last several years I have been wanting to get the rust fixed on it and it repainted but never had the money to do so.  So my husband decided to be sneaky and have it all done as an anniversary gift to me!  It looks so good now!


Supplies: Patterned Paper: ; Cardstock: Bazills; Alphabet Stickers: American Crafts Thickers and Cricut Cartridge - Winter Woodland; Embellishments: Embroidery Floss, Cricut Cartridge - Stretch Your Imagination, Pearls; Sketch: Sketches for Scrapbooking; Tools: Cricut.

Jul 6, 2011

Camp Croppin'


Every year a local scrapbook store puts on two day event called Camp Croppin' where you can take classes, meet some awesome people and crop your heart out.  This was my first time to Camp Croppin' and I had a blast with these girls!  I managed to get a couple of layouts done but I think I mostly gabbed the whole time!  Definitely a change of pace for me as I am usually a solo-scrapper in my scrapbook room.


I went a little cluster crazy on this layout!  I have a huge jar of loose embellies that I tend to add to as I open packages, use what I want and then need somewhere to put the leftovers.  I decided to take a look at what was in there for this layout and it was like I hit a gold mine!  Everything I kept pulling out was the perfect color or shape and I had way too many to narrow it down so I thought what the heck ... I'll use it all.  And so I did!  I love how it turned out and I might just have to hit that jar up more often now!


Supplies: Patterned Paper: My Mind's Eye - Quite Contrary Collection; Cardstock: Bazills; Alphabet Stickers: American Crafts Thickers and Cosmo Cricket Tiny Type; Embellishments: Way to many to remember where they came from; Sketch: Sketches for Scrapbooking; Tools: Creative Memories Corner Rounder and Stamping Up Curved Corner Tag Punch.

Jul 5, 2011

Thank You


Last week, we had to rush our dog, Angus, in for emergency surgery.  It was not something we expected and it was a very difficult day for us.  Luckily, Angus made it through surgery with flying colours and is now recuperating at home and is being spoiled rotten.  It's amazing how moments like this make you realize how precious life is!  The staff at the Animal Hospital were amazing and took such good care of our little baby that I wanted to thank them.  I decided to make a card and it's funny that when it came time write something on the inside, I was at a loss for words.  How do you really express how much you appreciate someones efforts to save someone you love?  I don't think words can.  Needless to say, I tried my best.  Thank you just does not seem to be enough!

Supplies: Patterned Paper: Bella Blvd - Tail Waggers & Cat Naps Collection; Cardstock: Bazzils; Alphabet Stickers: American Crafts; Embellishments: Bella Blvd - Tail Waggers & Cat Naps Chipboard Elements; Tools: Dymo Label Maker.

Jul 4, 2011

Time Flies

Happy 4th of July to all my American friends out there in blog land! Hope your day is filled with lots of fun, family, sunshine, and great memories!


I must of walked by this line a hundred times thinking I would never use it.  It's Basic Grey's Life of the Party.  I always seem to avoid Birthday lines.  I'm not sure why?  It's probably because I don't have kids so birthday parties are not a huge scrapbooking thing for me and for our birthdays my husband and I keep it pretty low key so that means there are rarely any photos.  As I was saying, I pretty much skipped this over because it was a birthday line since it came out.  Then the other day I was at my local scrapbook store looking for paper for these photos.  Yes I did look in my stash first but I couldn't find anything ... or maybe I didn't want to find anything and was looking for an excuse to shop ... who knows!  When I walked by this line the plaid paper caught my attention as the colors were perfect.  When I flipped it over I found it had a wood grain on the back.  Wait a minute!  I look at a couple of others and found they were wood grain too!  Next thing I knew I pulling a bunch of it off the shelf to do this layout (and maybe a couple more).  It seems that lately if it has wood grain, I will love it!  Seems odd, but I think it is because I have a lot of camping photos I need to do. I also find it easy to work with for both masculine and feminine layouts!  So once again Basic Grey has made a line that at first I had no need for and now I must own it!  They do that a lot to me!


Supplies: Patterned Paper: Basic Grey - Life of the Party Collection; Alphabet Stickers: GCD Studio - The Great Outdoors Chipboard Letters; Embellishments: K & Company Felt Flwoers and My Mind's Eye - Stella Rose Die Cut Title; Inks: Colorbox Chalk Ink; Sketch: Sketches for Scrapbooking; Tools: Dymo Lael Maker.

Jul 1, 2011

Happy Canada Day!

As you may or may not know, I am a Canadian and today is Canada's Birthday so to all my fellow Canadians ... Happy Canada Day! Enjoy your long weekend!