Apr 30, 2012

In the Church Garden


I'm loving the look of Doillies right now.  I picked up a couple of different sized ones at the local dollar store.  It's amazing what you kind find in there when you have 45 minutes to kill while waiting for an appointment!  I took one of the dollies and cut off the left side and tucked it under the photo on the right and then used it to put some word stickers one ... very pretty!  I then took the piece I cut off and placed it under the under the phtoo on the left so that it was just peaking out.  It kind of adds that girlie touch to the layout don't you think?


Supplies: Patterned Paper: Echo Park - For the Record Collection; Cardstock: Bazzills; Alphabet Stickers: Echo Park - For the Record Alphs, American Crafts Thickers, and Cosmo Cricket - Tiny Type; Embellishments: ;Echo Park - For the Record Element Stickers, Doillie, and  American Crafts Journalling Spot.

Apr 26, 2012

Vanessa & Lance


One wouldn't think finding blue flowers would be difficult but really it is!  There are so many shades of blue which makes matching difficult.  I wanted flowers for this layout but had nothing that worked.  It's hard to believe with my stash but it is true.  So I worked with what I had.  The blue polka dot one I made with ribbon and a glubber and used a silver sparkle brad that I coloured dark blue alcohol ink.  The suede flower had a bright blue jewel that didn't go so I took out my stickles and covered it up with silver stickles.  And the last flower was a bright blue resin flower that didn't work so I took out a Navy Copic marker and coloured it.


Supplies: Patterned Paper: ; Cardstock: ; Alphabet Stickers: ; Embellishments: ; Inks: ; Sketch: ; Tools: .

Apr 24, 2012

Family Hang Time


There's a new auction site called Top Hatter and I took a try at it.  I don't normally like auction sites because I just get so wrapped up in all that I loose all senseability!  So ... that being known I don't normally surf these sites but they gave me acredit for signing up so I thought I would give it a try.  I saw these Vintage bottle caps and decided I needed them.  So I bid and won ... yeah me!  I now have 50 Vintage bottle caps ... woozers!  Not sure what I will do with them all but I did manage to use one on this layout!


Supplies: Patterned Paper: Authentique - Splendid Collection; Cardstock: Bazzills; Alphabet Stickers: American Crafts - Campy Trails Alpha, October Afternoon - Mini Market Letters and American Crafts Thickers; Embellishments: Inks: Felt Hearts, Buttons, Twine, Vintage Bottle Cap, Smashbook Washi Tape, and Smashbook Tabs; Sketch: Sketches for Scrpabooking.

Apr 23, 2012

Winky the Wonder Dog

I love how this layout turned! I think it's the title. The orange puff letters and the talking bubble make me think of a comic book which is so fitting of my little guys newest nickname.


I wanted the talk bubble to have a more distressed look so I tried inking the edges with my regular ink but because it had a glossy finish, it would smear right off as soon as you touched it.  Then I decided to use my Archivers ink which is designed to work with glossy surfaces and although it was a little more tricky (I'm not patient when it comes to waiting for stuff to dry) to use I think I got the effect I was looking for


Supplies: Patterned Paper: Basic Grey - Max & Wiskers Collection; Alphabet Stickers: American Crafts - Thickers and Basic Grey Alphas; Embellishments: Bella Blvd Sticker Sheet, 7 Gypsies - 97% Complete Pet and My Mind's Eye Die Cut Star; Inks: Archivers Ink; Tools: EK Success Edger Punch.

Apr 20, 2012

Family


I had a few problems with my photos on this layout.  My camera was misbehaving that night and all of my photos had one problem or another: grainy, blurry, dark, you name it.  So in an effort to make them a little more consistent I made them a sepia tone which hid some of my photo problems.  How do you deal with problem photos?  Do you try to fix/hid them or do you scrap them as is?

Supplies: Patterned Paper: Basic Grey - Figgy Pudding Collection; Alphabet Stickers: American Crafts - Thickers; Embellishments: American Crafts - Thicker Shapes, Basic Grey - Figgy Pudding Die Cuts, and Drywall Tape; Sketch: Sketches for Scrapbooking..

Apr 19, 2012

Val and Shane's Wedding

A while ago, my neighbour approached me about making a wedding album for him to give his wife for their 5th wedding anniversary. They both have been over and seen someof my album and they both "love my mad scrapbooking skills" (hahaha) and he thought she would love their wedding album done. So how could I say no after so many compliments! Once again, I used supplies I already had in my stash so it was a great stash buster and the bonus is the money he has given me to cover my costs gets to go towards new stuff!!! Sneaky I know but would non-scrapbookers really be able to tell the difference between product release this year and a couple of years ago? I didn't think so either! So here's a couple of pages I completed for their album.


Apr 18, 2012

Sam and Chris' Wedding

So keeping in line with yesterdays post, I thought I would show you why I have been a little MIA lately on this blog. I have been working on wedding gift albums for two different couples. It's a little time consuming but so worth it! And because I decided to pre-plan my layouts like I did in Part 1 of Behind the Scenes, it didn't take me as long as I thought it would. This album for my cousin Chris and his beautiful wife Sam was done in about 2 weekends. Yes, I admit that this gift album is pretty basic when compared to some of my elaborate past works.  I didn't do much fussy cutting, or stitching, or obsessing over the perfect embellishment or new technique. I reserve that stuff for my own albums because I don't have the time constraints as I have had with this project.  Everything in this album (except for the actual album) came from one scrap pad that I already had in my stash, which was an awesome way to use up existing supplies as well as keep the theme consistent. In order, to keep this short and not to give too much of the album away, as the happy couple haven't seen it yet, I have only posted a couple of the pages I completed.


Now, be sure to come back tomorrow to see the some of the album I created for my neighbour's 5th anniversary!

Apr 17, 2012

Behind the Scenes - Part 2

Welcome to Part 2 of my peak behind the scenes of how I scrapbook.  If you missed the first part you can find it here: Behind the Scenes - Part 1 .   Now to be completely honest, I don't always scrapbook this way.  It's only when I am super organized, which is not always the case.  You will most likely find me doing this kind of scrapbooking for multi-page events like weddings, vacations, Christmas, etc where I have many layouts for the same event/theme.  Scrapbooking of what I call everyday life, you know all the stuff that happens in between these big events, tends not to be as well organized. But I digress.

So onto some fun stuff ... actual scrapbooking!  Now that I have the bones of  my layouts determined I get to assemble what I had planned.  So picking up where I left off in Part where I had already determined which photos I was using and croped the to the desired size for my sketch. So basically all I had to do was cut my patterned paper and glue it all together. It took all of the guess work out of the arranging!  So this point is this post is picks up. 


Sometimes, I follow my plan and other times I use it as a jumping off point.  Just to be clear, in this example I followed my plan fairly closely as this layout is for my cousins wedding album and I am trying to keep the album clean and sophisticated, not too fussy fussy!  I used all the papers, pictures and sketch I chose in my plan and quickly assembled the base and adhere everything down.  I know some scrapbookers layout everything out first to see how the layout looks but not me.  I stick it all down (and rip it up and stick it down again) as I go.  For me it works but only because I have a best friend called Undu, without it I would have to reconsider this method!


Now that the base is done, I get to embellish.  I have a love/hate relationship with embellishing.  I love to embellish but I hate to search for it!  I have tried many techniques to organize myself (and trust me I am a little OCD about my embellishments, ask any of my scrapbook buddies!).  But no matter how I organize things, I never seem to remember that perfect embellishment I bought 4 weeks ago that would look perfect on this layout!!!  I hate that!  I store stuff currently by theme which has been working for the most part. 


I have drawers of chipboard, stickers, and dies by themes like Christmas, Family, Travel, Seasons, Home, Holidays, etc. I store all my alpha stickers with my journalling spots in a box on my desk next to a two tier basket thingy in which I store tools and favorite go to and brand new items. If it's at my finger tips I will use it.  I also have this big fishbowl size glass that I store all my odds and ends in.  It's kind of like a junk drawer for my scrapbook room.  And if you visit you are welcome to whatever you can carry from it! 


I have so many other things, not pictured above, and trust me I am not bragging.  I have just been doing this for so long (almost 15 years now) that I have collected a lot.  I wish I could say I am not a hoarder but I know that everything I have bought over the years has cost money so I am trying to use it but it takes me almost twice as long to decide on my embellishments as it does to pick my pictures, paper and layout design!  So now back to what I was doing with the assortment of possible embellishments I have chosen for this layout.


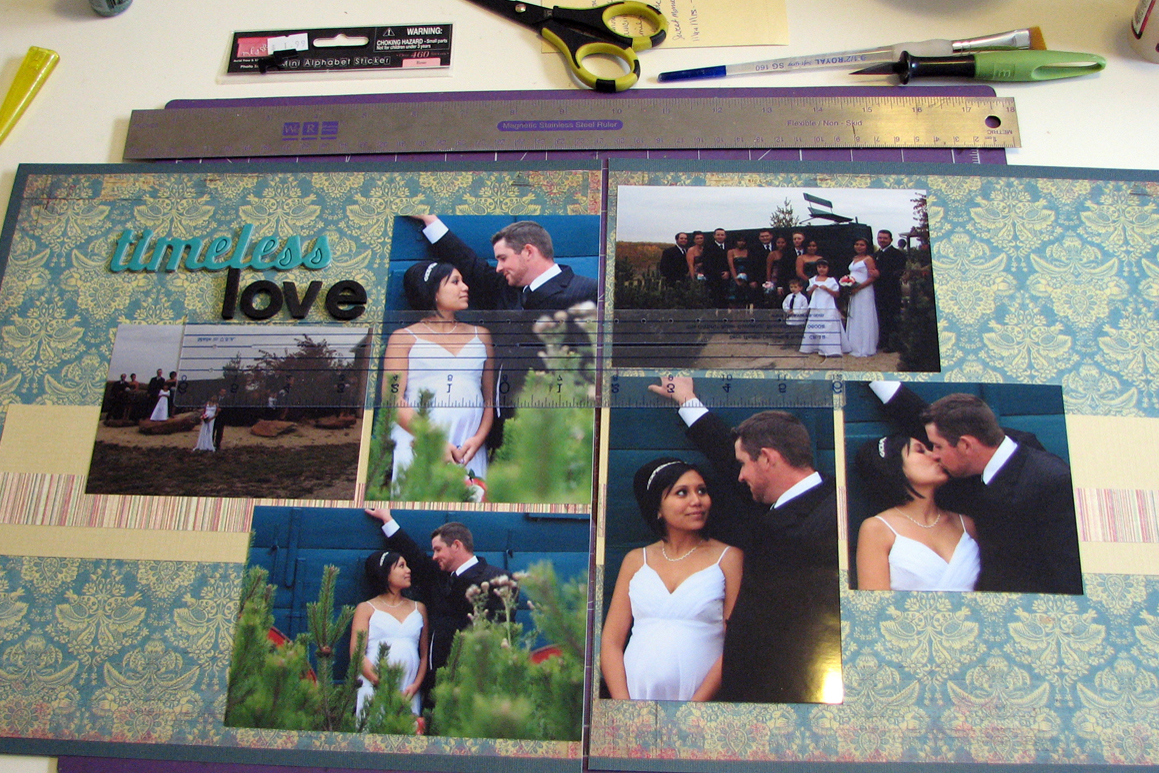
First thing I normally do is decide on my title and then where to place it.  I tend to stick my alpha, if they are sticky otherwise I just lay them on the layout, to a plastic see through ruler and then I try them in different places on my layout.


Nope, I think I like it better down here.  And I stick it down.


Next comes all the little details.  I decided that I wanted to co-ordinate with the black letters I used for the word love and I had these perfect 97% Complete Stickers from 7 Gypsies that work perfectly.


There were too long for where I wanted to use them so I cut it into two pieces and staggered them a bit above my title.


I then added another saying to the far left in a similar fashion and then added 3 black brads.


And there you have it.  This layout is done!


Now I know that this is a simple layout, nothing too fancy and there's no journalling as this layout is as I said before a gift for my cousin, but it still turned out very nice.  See not everything has to take 16 hours to do.  I managed to finish this album in two weekends because it was pretty simple: one weekend for the planning and then one weekend for the assembling and embellishing.  Sometimes we need to be able to do layouts this way just to get caught up.  I am a firm believer that not everything has to be a masterpiece.  If it shows my pictures and preserves my memories that pretty awesome too!  Now I am planning a part 3 which will show the chaos of an unplanned layout which I am hoping to post up soon!  Stay tuned!

Apr 16, 2012

Gave it a Try and Finished!

Do you remember this post?   The one where I declared to you all that I was giving Quilting a try and taking a class.  Well here's my finished product.  You'll have to excuse the numerous photos but to quite honest I am proud of this one.


I really did learn quite a bit in the class even though I have made a quilt before and now that I am armed with more knowledge I think I might make a few more.  I just need to find an easier way to do binding because that part (hand sewn) is not my favorite thing to do, plus my finger tips were killing me come the end!

Apr 14, 2012

Do I Have To?

And here it is. The last page of my Jamaica 2011 album.   What a pouty face I have.  It was a horrible and blurry photo but I decided I would use it anyway!  This was the first vacation I was truly sad to see end, hence the pout from the bus window.  I was not ready to go home.  Both the hubby and I were sick on this trip so we really only had the day we got there and the day before we left together where we both weren't sick.  It seemed like such a shame to have to go home.  I think if you are that sick that you can't leave the room for three days, your trip should be extended three days.  It's like sick days for your holidays!  Who do I have to talk to in order to get the ball rolling on that one?!

Ok how funny is it that the big sticker in the top right corner says AND?  The whole time I had it I would of swore it said SAND.  Even when I stuck it down I thought it said SAND.  And now that I see it on here I see that it says AND.  That is hillarious, so much so I had to make fun of myself!


I love sticker borders but I have a huge pet peeve that they do not reach edge to edge on a 12 x 12 sheet piece of paper.  Come on Manufacturers ... let's make stickers that go the distance!  To make mine stretch I actually cut them underneath where I have my glass bead (top border) and my date spot (bottom border) so that there was a small gap so that the ends reached the edges of my sheet.


I got this pretty acryllic butterfly from a dear scrappy friend for my birthday (Thanks Dana!) and I thought it worked perfectly on this layout.  I folded up the wings so that they would pop up and then just adhered the butterfly's body to layout.  I'm sure once this puppy makes it into an album he will be squished back down but until then it looks like he just landed there.

Supplies: Patterned Paper: Basic Grey - Indian Summer Collection; Cardstock:Bazzills ; Alphabet Stickers: Doodlebug Alphas; Embellishments: Glass Beads, Jillibean Border Stickers, Jamaica Stickers and Scenic Route - Beach Chipboards.

Apr 13, 2012

Jamaica 2011

I am almost done my 2011 trip to Jamaica pictures, just one more post after this one! I tend to take enough pictures on all my trips that I am known to fill a whole album per trip (the record is four albums for one trip but that was a trip of a lifetime on the other side of the world ... that's my excuse and I am sticking to it!). With every trip album comes a title page and this is my one for Jamaica.


My sweetheart husband found this map of the Caribbean showing Jamaica for me at the airport before we left the island. He is such a dear, keeping his eye out for neat items I can throw in my albums. I love this map and thought it would be so cute to put a heart around the island. Originally I was going to stamp and emboss a heart but my luck with embossing is not the best and seeing as I only had one map I didn't want to mess it up so I decided on stitching the heart instead. Isn't it cute!


Supplies: Patterned Paper: My Minds Eye - Stella Rose Collection; Cardstock:Kraft Cardstock; Embellishments: Embroidery Thread, Prima Flowers, and Travel Book Plates; Tools: EK Success Scalloped Edger Punch and Black Zip Pen.

Apr 5, 2012

Our Spot

A quick layout I did about our favorite place to hang out on the resort. It's funny really that we would get up earlier than we do at home just to secure the best seats on the resort! So worth it though, the beach only had a few grass huts and they were snatched up fast and without a grass hut I would of been burnt like a crispy critter!


Supplies: Patterned Paper: My Minds Eye - Good Day Sunshine Collection; Cardstock: Bazzills; Alphabet Stickers: American Crafts - Thickers; Embellishments: Basic Grey - Wanderer Felt Flowers, Scenic Route - Beach Chipboards, and Fancy Pants Journalling Spot; Sketch: Sketches for Scrapbooking; Tools: EK Success Double Scalloped Edger Punch.

Apr 3, 2012

Behind the Scenes - Part 1

I thought for a change I would give you a little peek behind the curtain to see my process of scrapbooking. I am always curious on how people do it so I thought maybe I would do a post on it which might encourage some others to give a peek too! If you do (or have) leave a link in the comments, I would love to see it!

So I scrapbook in two stages and today's post is all about my first stage. So grab your coffee and sit back as I lead you through the twists and turns of the crazy creative process!

I tend to print my photos in batches when there is a sale on. This time around, I printed all of my Jamaica 2011 photos along with picture for three weddings (I am doing albums for two of the couples) and some ones I have had floating around from last year. So when I get home I have hoards of sorting to do. Normally I plop myself on the couch and sort each photo into piles that will eventually end up on layouts.


 I will then start looking through each group trying to decide what I want to do with the layout. Sometimes I am inspired and this comes easily, other times I go to sketches to help me out. If I am decided on a sketch, I will normally crop my photos at this time.


Next I start flipping through my hoards of paper to find paper to use for each layout. I usually have an idea of what kinds of paper I am looking for and that will usually pair down the amount of paper I have to go through. I try to find at least three to four sheets of paper that go together and match my photos that way I have some leeway when I actually sit down to scrap! I usually take this opportunity to look at what's in my odds and ends box (mostly strips of patterned paper) for stuff I can use.


Once I have all this figured out, I will clip it all together with a bull dog clip and put it in my to be scrapped bin.


The best part is in about the time it took to watch a movie (about 2 hours), I planned about 12 two page layouts! 


I am now ready for whatever comes my way ... a crop, a trip to a friends house, or a 1 am creative, I can't sleep surge. I find it motivates me to scrap more because most of the hard stuff is done and all that is left do is assemble and play!