Oct 25, 2011

Last Minute Weekend

I love ribbon, just ask anyone who has been in my scrapbook room! I have been collecting it for years and probably got at least a years worth without buying another inch and still not run out! I'll admit, I might be a little obsessed! My tastes over the years have changed slightly though. I used to buy a lot of printed patterned ribbon (strips, dots, swirls, etc) but lately I have been gravitating towards what I call structured ribbon. I'm sure that's not the technical term but that is what I call it, okay? So let me explain. I like ribbons that have a structured pattern (pleats, stitching, shape, natural fibers, etc) instead of a printed pattern. I just find them more flexible because typically you are not fighting with both pattern and colors, if you get what I mean.


I also like ribbons that have been around the block a few times and are still trendy, like the Ric-Rac ribbon I used on this layout. Isn' that large Ric-Rac ribbon just awesome! Ric-Rac has become my new obsession and now that my local fabric store carries it by the yard ... I might be stocking up on some!


Supplies: Patterned Paper: Cosmo Cricket - Wanted Collection, ; Cardstock: ; Alphabet Stickers: Basic Grey - Alpha Stickers and Jolee's Woodgrain Letters; Embellishments: Ric-Rac, Reminisce Camp Sayings Stickers, and Cosmo Cricket - Mr Campy Journaling Spot; Inks: Colorbox Chalk Ink; Sketch: Sketches for Scrapbooking Volume 1;.

Oct 21, 2011

Vanessa's Bachelorette Party

This past July I made the trek up to Edmonton to go to my cousin's bachelorette party. It was a great time with lots of laughs and I wanted this layout to be just as fun as I remembered the night.


Does this layout look vaguely familiar? It's actually using the same sketch as this layout that I did when I was designing for Sketch Support. That's why I love sketches, change one or two things and it looks like a different layout!


This cute little banner came with the paper collection and I really wanted to use it but the banner spelt out happy which didn't work for me.  So I hit my stash looking for something to cover the letters.  I found these metal letters that I think we done by Making Memories years ago and you know what?  They worked perfectly and now my banner says Party!


Ok, so I went a little nuts with side panel, I'll admit!  There's a lot to see!  I just kept finding things, as I digging for the above mentioned letters, and it all went great with idea in my head.  I absolutely love how it turned out!

Supplies: Patterned Paper: Basic Grey - Life of the Party and Cosmo Cricket - Garden Variety; Cardstock: Bazzills; Alphabet Stickers: American Crafts Thickers, October Afternoon Mini Market, and Making Memories Metals Alphas; Embellishments: Jillibean Journalling Spot, My Mind's Eye So Sophie Die Cut, Bakers Twine; Inks and Basic Grey - Life of the Party Clips: Colorbox; Sketch: Sketches for Scrapbooking Volume 8; Tools: Creative Memories Corner Rounder.

Oct 20, 2011

Another Dam Dive

When I saw this collection from Bo Bunny, I fell in love. I loved all the colors and patterns and because most of them were designed to look like it was underwater I knew they would be perfect for the photos I took of my hubby and brother scuba diving this summer!


One of the patterned papers came with this cute little turtle on it.  I didn't want to cover him up but the way my layout worked the photo on the left was going to cover half of him!  Yes, I didn't plan properly when cutting my papers, otherwise I would not of had this problem!  Anyways, I sitting there trying to figure out how to rescue him from being covered up when it dawned on me ... if I cut him out a little bit, I could slide the corner of my photo underneath him.  Tada!  Problem solved and turtle rescued!  I them added a little bit of glossy accents to his shell to give him some dimension.


Supplies: Patterned Paper: Bo Bunny - Barefoot and Bliss Collection; Cardstock: Bazzills; Alphabet Stickers: American Crafts Thickers; Embellishments: ; Sketch: Sketches for Scrapbooking - Volume 7; Tools: Dymo Label Maker and Creative Memories Corner Rounder.

Oct 18, 2011

Mad Skills

Those marketing people sure know what they are doing. Those little bins by the tills are what I am referring to. Pure genius! Let's put a lot of little cheap items right by the till so that while people are waiting to pay for the items they have already picked out, they can continue to shop! Normally I avoid these little bins like the plague but I was at Michael's a while back and the line was quite long. Standing there staring into these bins while I wait my turn, my resolve disappeared. That's when I saw this little bag of multi-colored sequins. I decided I needed them, plus it was only $1! I wasn't sure how I would use them but knew I would find away. I laughed at myself on the way home ... how silly am I. They sat on my desk for a couple of weeks until I came to this layout and decided to give them a try. They look like bubbles after all! Now I am hooked! I have plans for them for my Christmas cards and layouts ... think ornaments on a Christmas tree or snow flakes falling from the sky!


And here's a close up shot of those pretty little sequins!  They didn't show up to well in the full layout shot but they sure look great in this close up!


Supplies: Patterned Paper: Bo Bunny - Barefoot and Bliss Collection; Cardstock: Bazzills; Alphabet Stickers: American Crafts Thickers; Embellishments: October Afternoon - Fly A Kite Word Stickers and Sequins; Inks: Colorbox Chalk Ink; Sketch: Sketches for Scrapbooking - Volume 8.

Oct 17, 2011

Blog Hop Winner!

Thank you everyone for all your kind words about my blog hop project! I really appreciate them and enjoyed reading each of them. As promised I have drawn a random number using the Random.Org webiste and the winner is lucky number 10!


Congratulations All About UNC!  Please send you mailing info to jenniferdewolfe (at) gmail (dot) com and I will send your package out to you!

I would like to take this opportunity to thank Amanda again for hosting another fantastic blog hop!  I always enjoy participating and seeing what everyone else does.

Oct 13, 2011

One Fall Day + Blog Hop

Hello and Welcome to the Leafing Memories Behind blog hop! I am so happy to have you stop by my humble little blog! If you did not arrive to my blog from the uber talented Ashley's blog please return to Amanda's blog to follow the hop in order so that you don't miss any wonderful inspiration from the amazing ladies participating with me!

The idea for the blog hop this time around is pretty simple this time. The requirement for this project is that it must have leaves (or a leaf) in it in some way shape or form. I went with my go to project, a layout:


I placed my title on the layout but I found it was just floating there, completely disconnected.  So I took to my needle and thread and created a swirl effect surrounding my title all the way down to the floating leaf.  I then added a little more stitching to the right as well.


For the leaves on my layout I created them myself using felt with stitched veins.  It worked out great because I could make them any size I needed, in any color I wanted!


And now you have your chance to win!  I am doing a giveaway to one of you.  Simply comment on this post and become a follower.  I will do a random draw on Monday morning; make sure to check back then to see if you won.

Don't forget about Amanda's giveaway!  Take the inspiration we've provided you and create your own project that is leaf inspired.  Post it to your blog, gallery or Flickr and share the link here in the Mr Linky widget on Amanda's Blog.  You have until the end of day Sunday, Oct 23 to post!  

Now for the next stop on your blog hop, please head on over to very funny and super talented Kathy!

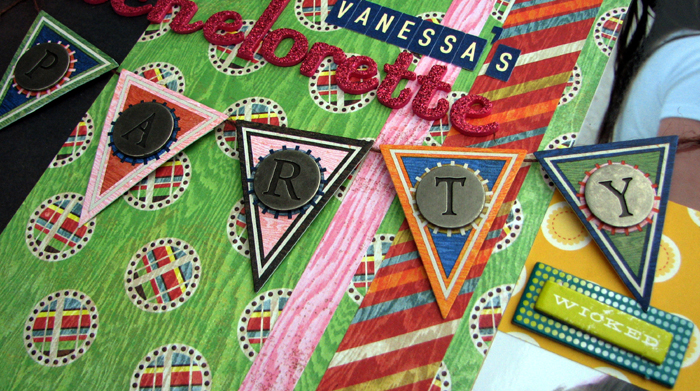
Supplies: Patterned Paper: My Mind's Eye - So Sophie Collection; Cardstock: Bazzills; Alphabet Stickers: American Crafts Thickers and Doodlebug; Embellishments: Felt and Embroidery Floss; Inks: Colorbox Chalk Ink; Sketch: Sketches for Scrapbooking Volume 3; Tools: Creative Memories Corner Rounder.

Oct 12, 2011

He's An Outlaw Now


I remember when Stickles were the hottest thing and I think I had bought them in every color!  I used to use them on almost every layout but for the last couple of years they have sat on my shelf collecting dust.  I couldn't bring myself to get rid of them because I might use them some day.  Do you find you do that with supplies?  Well for this layout I decided to break them out again.  I wanted the yellow letters to look like they were wet so I applied some Distress Rock Candy to each of them.  And like most things, I couldn't stop there so I added a bit to the edge of the journalling spot.  It just gave things a little bit more umph.


Supplies: Patterned Paper: Fancy Pants - Beach Bum Collection; Cardstock: Bazzills; Alphabet Stickers: American Crafts Thickers and Doodlebug; Embellishments: Fancy Pants - Beach Bum Journal Embellishments and Distress Rock Candy Stickles; Inks: Colorbox Chalk Ink; Sketch: Sketches for Scrapbooking - Volume 7; Tools: Creative Memories Corner Rounder .

Oct 11, 2011

Fright Night

I had a really tough time with these photos! They were all really dark and most of them were blurry. But it was a fun night and I still wanted to scrap them. Most Halloween collections have a lot of black in them which really didn't help the photos. Then I remembered this collection by Cosmo Cricket that my friend had given to me after she had used what she wanted ... I love leftovers! It was perfect because it wasn't dominantly black! I think the strong oranges and greens helped to contrast the crummy photos so that I could scrap them and not look at the layout and be disappointed.


Supplies: Patterned Paper: Cosmo Cricket - Haunted Collection; Cardstock: Bazzills; Alphabet Stickers: American Crafts Thickers; Embellishments: Cosmo Cricket - Haunted Blackboard and Cosmo Cricket - Haunted Stickers; Inks: ; Sketch: Sketches for Scrapbooking - Volume 8; Tools: Dymo Label Maker.

Oct 9, 2011

Happy Thankgiving!


I just wanted to send a Happy Thanksgiving to all my fellow Canadians today who are celebrating with family and friends! May you all take a moment to be thankful for the things in your life that make you smile and eat lots of turkey and pumpkin pie!

Oct 8, 2011

Springtime

Our first spring with no landscaping work to be done ... Yippee!  Instead we could sit back and watch everything grow.  This year it was a long winter followed by a late spring so to say we were excited to see the tulips, in mid-June, is an understatement!


This Springtime collection from Echo Park was perfect for my spring time photos and I was dying to use it!  There were so many pretty papers to choose from that I had a hard time deciding!  I love the sticker sheet too and had to use the sun and cloud on this layout!  I thought the rain drops needed a little umph so I added some Glossy Accents to them and then sprinkled them with glitter.  Now they look like they are glistening!  Warning -  If you use glitter don't make the same mistake I made and sneeze over top of an open bottle.  Trust me ... huge mess!


Supplies: Patterned Paper: Echo Park - Springtime Collection; Cardstock: Bazzills; Alphabet Stickers: Echo Park - Springtime Sticker Sheet Alpas; Embellishments: Echo Park - Springtime Sticker Sheet, Glitter, Ribbon, Jewels, Making Memories - Chipboard Flowers; Sketch: Sketches for Scrapbooking - Volume 2; Tools: EK Success Dotted Scallop Edger Punch.

Oct 3, 2011

It's Finally Official

My hubby has spent the last three years working on his Master's Degree in Computer Information Systems. It has been a long road but this spring he finally completed all of his graduation requirements! I am so very proud of him and all the hard work he had to put into completing this daunting task! I am even more proud at how well he did, warning ... here comes a bragging moment, achieving a 98% overall grade! Because a lot of his course work was done by correspondence he received a lot of communications from the University via mail, including his Degree. This layout is about the day he received his piece of paper in the mail


Banners are really hot right now scrapbooking. I always have a hard time incorporating them. For some reason I always associate them with birthdays but this collection came with a little sticker banner and I thought I would give it a shot. I found it just a little plain on it's own so I pop dotted it and then put the year on each pendant just to give it a little more umph!


Supplies: Patterned Paper: Pink Paislee - Old School Collection; Alphabet Stickers: American Crafts Thickers and Basic Grey Alpha Stickers; Embellishments: Pink Paislee - Old School Die Cut Stickers, Buttons, and Twine; Sketch: Sketches for Scrapbooking Volume 8; Tools: Dymo Label Maker.