
Mar 16, 2011
Mojitos
Ok I will admit it ... I love Mojitos! I must seeing as I made a layout about them. I thought that seeing as most of the pictures of Cuba featured a Mojitos in the background somewhere that maybe they deserved their own layout. I even learnt how to make them while I was there so if you are interested in a mean Mojitos, let me know and I will give you the recipe!

Mar 15, 2011
Photogs
The nicest thing about travelling in a large group is that there ends up being more photos of me because there is always someone else there taking pictures too! It's so nice. I guess that just means that I need to hand off my camera more often when it's just me and Steve!

I love the film strip ribbon from Tim Holtz! It's so cool and works great on so many different layouts. I got the bright idea that I wanted the film strip to be rolled up on one end but it didn't want to cooperate for me. Because the ribbon is plastic it didn't want to stay put with out me holding it in place while the adhesive dried. So even thought it didn't quite work out the way I want (I had to cave and use a brad to hold the end of it) I still really like the look.

I love the film strip ribbon from Tim Holtz! It's so cool and works great on so many different layouts. I got the bright idea that I wanted the film strip to be rolled up on one end but it didn't want to cooperate for me. Because the ribbon is plastic it didn't want to stay put with out me holding it in place while the adhesive dried. So even thought it didn't quite work out the way I want (I had to cave and use a brad to hold the end of it) I still really like the look.
Mar 14, 2011
Bride 2B

The photo totally inspired this layout. It's of my sister-in-law, the day before she got married standing line at a bank in Havana. Doesn't she look so happy? Originally I was going to make the title "Bride To Be" but it didn't fit right in the space I wanted. Then it downed on me, using texting lingo instead so that is where the 2B came from! The white flower is made from a piece of fabric and is really easy to make. Here's where I learnt how to make them. Now the product they are using, Glubers, wasn't available so I improvised by covering a chipboard punched circle in adhesive and it seemed to do the job pretty good. I then stuck some pins in the middle of the flower and I was done. It looks so pretty!

Mar 12, 2011
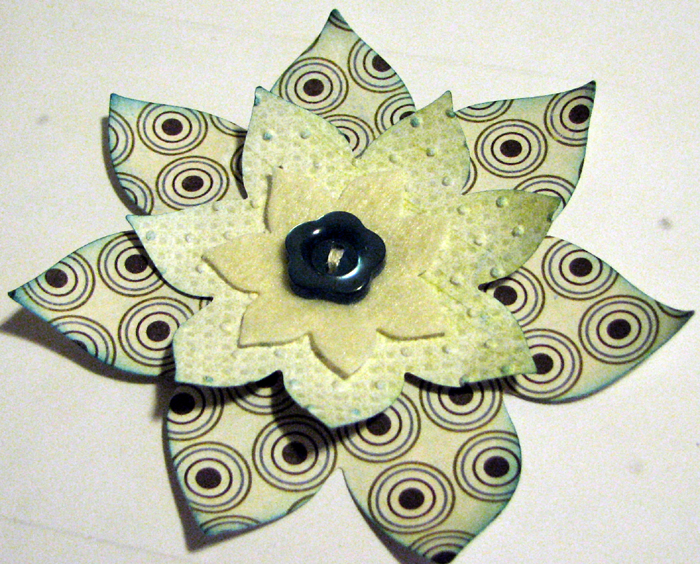
Friends

I'm still on my homemade flower kick and here's another one. It's easy to make really. If you are doing it all in patterned paper you can simply cut three different sized flowers using your Cricut but if you want to use felt like I did in this one, you will need to use your Cuttlebug. Please see below for a tutorial on how I pulled it all together. I hope you like it.
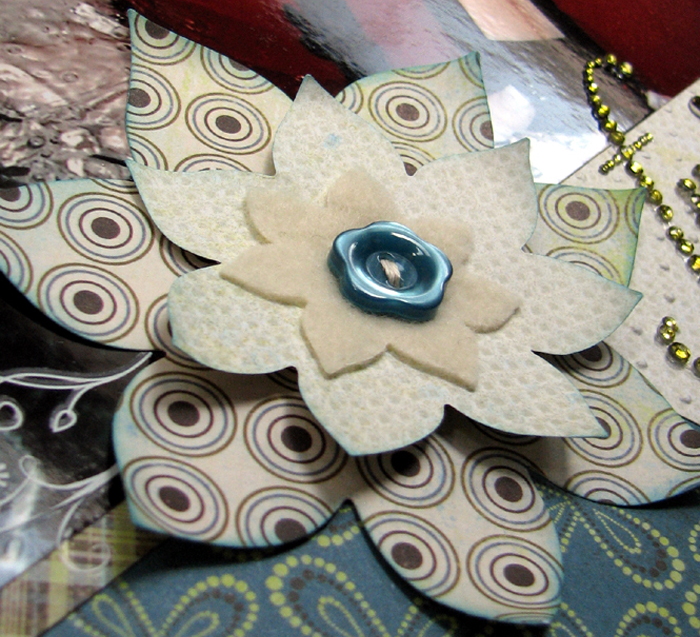
Before I start, first off I want to apologize or the quality of the photos but it was dark when I shot the photos.
Step 1: Using my Cuttlebug, Nestabilities flower dies and a double sided patterned paper, I cut out the flower shapes.

Step 2: Using the smaller die, I cut the shape out of felt. An important tip that will help you to get a clean cut of the felt is to put a piece of scrap paper under the felt before cutting.

Step 3: I put a couple of pop dots on the middle sized flowers. Now make sure they are spaced as close to the outside as possible. You will see why in a couple of steps.

Step 4: Adhere the middle sized flower to the bigger flower. You will also notice that before adhering, I ran the middle sized flower through my Cuttlebug in an embossing folder.

Step 5: Now I place the button in the center of the flower and using my paper piercer I poke holes through both flower layers that match the button holes.

Step 6: Thread a needle and start from the back. Make sure to secure your end really well to the back of the flower. This is important!

Step 7: Thread on the felt flower and button and then stitch until secure. You want your stitches to be as tight as possible without ripping the paper. This is why you placed the pop dots far apart and it will dimple the center of the flower.

Step 8: For added color and depth I inked the edges of the petals and using my thumb I curved the petals slightly.

And there you have it, your own version of the flower I made for this layout! Have fun!
Mar 11, 2011
Zipper Flower

I know I promised this tutorial last week but it has been a busy week for me and unfortunately I didn't get around to this until now. But I figured late is better than never! Right?! So without further ado ....
Step 1: Cut a circle out of chipboard. I use chipboard for all my handmade flowers as it provides a solid base that doesn't warp with most adhesives.

Step 2: Take one side of a zipper and using your glue gun (it's the best adhesive I tried) add a little bit of hot glue to the chipboard along the edge and place the zipper in it. You may have to work the zipper a bit to follow the curve of circle.

Step 3: Once you have wrapped all the way around the chipboard circle you start moving inwards repeating the same method you used in step one in small sections at a time.

Step 4: Continue all the way around the circle, moving closer and closer to the center until you have run out of room.

Step 5: Adhere a button or a brad to the center of the flower.
And there you have it. Your own zipper flower. The best part is you still have the other side of the zipper to make another flower or you can barter it for something with another scrapbooker!
Subscribe to:
Posts (Atom)