

Next i move onto picking my paper. I usually try to pick colours from my photos and in this case I went with greens, yellows and pinks from the dresses. I have a bunch of 6x6 paper pads and seeing as I wanted just strips of patterns I decided the 6x6 format would work. So I picked out 5 patterns (I always try to use the rule of odd numbers when putting things together) that co-ordinated with my colours and that looked good together.

Now I wanted my strips to be a little bit longer than 6 inches long so I cute each 6x6 square in half so that I could stick them together end to end to make it long. I like to do this because most of the time my seams will be hidden and I find it wastes less paper when I am only looking for a strip.

See here I taped the two ends together and unless you were looking really hard, most people would not notice the seam. After I had the two pieces together I trimmed it to be the size I wanted (9x2)

I do a test run to see how things are looking. Not bad but something is off.

I can't see enough of the patterned strips. So I crop my photos to be 4x5 instead of 4x6. Now that looks better.

I take out my bazzills white cardstock (a staple in my stash!) and dry fit it to my liking. Once I have the arrangement I like, in this case I played around with the patterned strips till I got the order and placement just right, and then I stuck it all down.

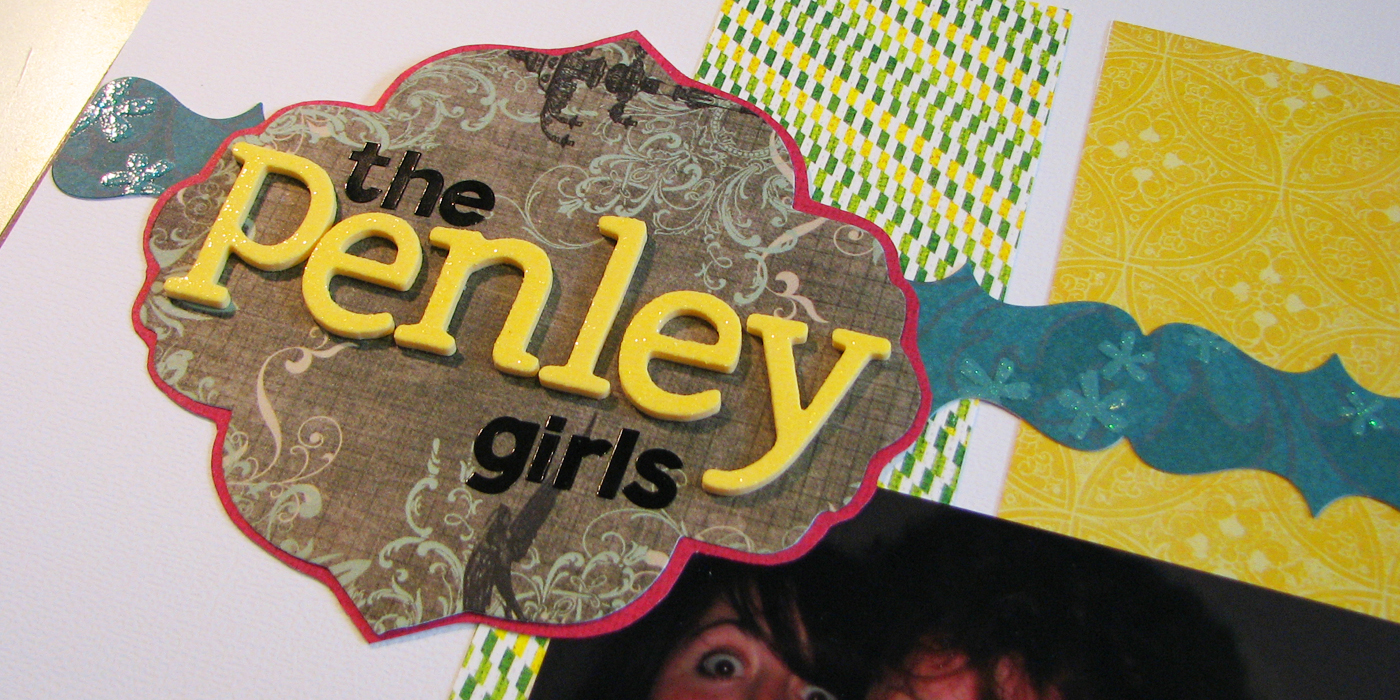
Next came the title. That's where I usually start after I have what I consider the layout part down. This is now embellishing to me. I picked out my letter stickers (most of the time it's Thickers ... I have an obsession) and I new I wanted to place the title on something so that it didn't get lost on my background. I laid out the letters on my clear ruler and then pulled out a few journaling spot books that had spots that went with my patterned strips. I laid my letters on each only until I decided which looked best and once I found it, I stuck the letters down.

Now I decided I wanted the spot to have another layer so I stuck it on a scrap piece of paper that was bigger than the spot then using my scissors I cut around the curves of the spot leaving about an eight of an inch border. I then added the rest of my alphas to finish my title. I also chose a border die cut strip from K & Company that I wanted to use but there was the problem of it not reaching all the way to the end of my cardstock.

So I figured out where my title block would sit and that's where I made a cut. This allowed me to shift the border strip over to the edge of the cardstock and my title block will cover up the gap.

See, you can't even tell!
Now that I was happy with my title block it was time to focus my attention on the bottom right side of my layout. I always work opposites, I find it balances out my layout for weight and focus. I started with my journaling spot. Now if I am not sure how things will look I will start with just laying things out and then once I like what I am seeing I will glue it down. I am always afraid on something moving and I can't remember how I had it so first chance I get that puppy is glued down!

Now I wanted to use flowers on this layout so I had some picked out. Hey it's a layout about girls so I always take that opportunity to girly it up. Most of my layouts are about my hubby or my puppy so I don't get much chance to go flowery! I layered a couple of canvas flowers in colours that worked and then used a Flair button as the center of my flower.

I decided there needed to be more height to this side. I wanted it to touch the border die cut strip along the top. So I found some flag poles from an embellishment set from Pink Paislee that worked great so I used two of them.

I decided that I like the heart shaped Flair so I added it to my grouping too.

Next I added in my journaling.

And because I follow the rule of odds I decided to add another Flair button over my title.

At this point, I was pretty close to done but I wanted to use some bakers twine. So I threw in an eyelet and then wrapped some bakers twine around my die cut border strip. I really liked the texture it added.

I liked it so much that I decided to add a few stitches at the tops and bottoms of each of my background strips in a complimenting colour.

And there you have it, my completed layout. I sure hope you enjoyed this little 3 part Behind the Scenes peak.
 | Supplies: Patterned Paper: Crate Paper - Farmhouse 6x6 Pad, Crate Paper - Random 6x6 Pad, and Basic Grey - Oliver 6x6 Pad, Basic Grey - Fort Lauderdale 6x6 Pad; Cardstock: Bazzills; Alphabet Stickers: American Crafts Thickers and Making Memories Alphas; Embellishments: K & Company - Journaling Pad, Twine, Eyelets, K & Company - Border Strips, Basic Grey - Fort Lauderdale Build a Flower, Basic Grey - Fort Lauderdale Journaling Spot, American Crafts - Flair Badges, and Pink Paislee - Soiree Flags. |
1 comment:
Duuude! I love this layout. LOVE it. love love
Post a Comment