Sorry about being a day later than promised with posting a winner but it was a busy couple of days for me this weekend.
Without further ado, and thanks tothe winner of Mother's Day Blog Hop is Random Int generator, Dana MK! Yeah Dana! I am so excited for you. Please send me (jenniferdewolfe (at) gmail (dot) com) your address as I think I have your address from prior to your move and I will drop you prize in the mail!
And because this is my 400th post, I decided to choose a second name for a celebration prize. Devra you we the lucky commenter chosen! Please send me (jenniferdewolfe (at) gmail (dot) com) your address and I will get your goodies sent off to you!
Thanks to everyone who joined in the blog hop and for leaving such wonderful comments!
Showing posts with label Blog Hop. Show all posts
Showing posts with label Blog Hop. Show all posts
May 8, 2012


May 3, 2012
Mother's Day Gift Box and Blog Hop
Welcome to the Mother's Day Blog Hop! I would like to take this opportunity to with all you Mom's out there a very wonderful Mother's Day! You should of arrived here from Moongirl's blog and if you got lost along the way you can go back to Amanda's blog to get your bearings!
For this Blog Hop, we were challenged to create a page about your mom, about you as a mom or even go past scrapping into a gift idea or paper crafts project for Mother's Day. The interpretation was left up to us so for this hop I decided to make a pretty little box to put the gift for my Mom in. The box is very easy to make even if you don't have the Scor-Board like I do. So let's get started! Pick out two co-ordinating double-sided papers; one for the bottom of the box and one for the top of the box.

I trimmed my bottom piece to be 8x8 and then scored it at the two inch mark all the way around.

After scoring, I folded all of edges inward so that the pattern would end up on the inside of the bottom of the box. The lid will cover most of the bottom box so the pattern is better used on the inside!

Pick opposing sides and trim the two of the folds to the perpendicular fold line.

You will now adhere these folds together and you will see the box start to take shape. Repeat on the other side.

Now, it's time for the top. I cut the top of the box to be 8.5x8.5. I wanted the edge of my top lid to have a decorative edge so I took out a border punch and fancied it up a bit. Once I had the decorative edge done I then scored my lines so that the finished top size would be 4.12 in size. To get this it will depend on the size of border punch you use. For mine the score lines were at 1.75. Now fold and adhere the box for the top just like you did for the bottom one.

I had some reminants left over so I decided to make a paper rosette for the top of the box. I have done a tutorial on this technique here if you are interested in how I did it.

I stuck the rosette on the top of the box.

Added a crochet flower and a button with ribbon.

And there we have it. The most adorable little gift box that took me 20 minutes to make. Knowing my Mom this will end up on display somewhere so that is why I wanted to make it extra special for her.

So how about a give away? Leave me a comment and become a follower and I will pick a lucky winner on Monday to win a scrappy prize! So next on your hop head on over to the talented Adele's blog and thanks for stopping by!
For this Blog Hop, we were challenged to create a page about your mom, about you as a mom or even go past scrapping into a gift idea or paper crafts project for Mother's Day. The interpretation was left up to us so for this hop I decided to make a pretty little box to put the gift for my Mom in. The box is very easy to make even if you don't have the Scor-Board like I do. So let's get started! Pick out two co-ordinating double-sided papers; one for the bottom of the box and one for the top of the box.

I trimmed my bottom piece to be 8x8 and then scored it at the two inch mark all the way around.

After scoring, I folded all of edges inward so that the pattern would end up on the inside of the bottom of the box. The lid will cover most of the bottom box so the pattern is better used on the inside!

Pick opposing sides and trim the two of the folds to the perpendicular fold line.

You will now adhere these folds together and you will see the box start to take shape. Repeat on the other side.

Now, it's time for the top. I cut the top of the box to be 8.5x8.5. I wanted the edge of my top lid to have a decorative edge so I took out a border punch and fancied it up a bit. Once I had the decorative edge done I then scored my lines so that the finished top size would be 4.12 in size. To get this it will depend on the size of border punch you use. For mine the score lines were at 1.75. Now fold and adhere the box for the top just like you did for the bottom one.

I had some reminants left over so I decided to make a paper rosette for the top of the box. I have done a tutorial on this technique here if you are interested in how I did it.

I stuck the rosette on the top of the box.

Added a crochet flower and a button with ribbon.

And there we have it. The most adorable little gift box that took me 20 minutes to make. Knowing my Mom this will end up on display somewhere so that is why I wanted to make it extra special for her.

So how about a give away? Leave me a comment and become a follower and I will pick a lucky winner on Monday to win a scrappy prize! So next on your hop head on over to the talented Adele's blog and thanks for stopping by!
 | Supplies: Patterned Paper: My Minds Eye - Kaleidoscope Collection; Embellishments: Button, Crochet Flower, and Ribbon; Tools: EK Success Large Scallopped Edger Punch and Martha Stewart Scor-Board. |
Dec 5, 2011
Homemade Holiday Blog Hop Giveaway Winner!
Thank you everyone for all your kind words about my blog hop project! I really appreciate them and enjoyed reading each of them. I am glad to see that a lot of you have similar memories as I do attached to ribbon candy! It's funny how little things like that bring the memories flooding back, isn't it! As promised I have drawn a random number using the Random.Org webiste and the winner is lucky number 5!

Congratulations Steffanie! Please send you mailing info to jenniferdewolfe (at) gmail (dot) com and I will send your package out to you!
I noticed a couple of questions in the comments as well as some things I forgot to mention so I figured I would do it hear and now!
I would like to take this opportunity to thank Amanda again for hosting another fantastic blog hop! I always enjoy participating and seeing what everyone else does.
Congratulations Steffanie! Please send you mailing info to jenniferdewolfe (at) gmail (dot) com and I will send your package out to you!
I noticed a couple of questions in the comments as well as some things I forgot to mention so I figured I would do it hear and now!
- For my ribbon length I didn't really use a specific length. Each ornament I made is made using what ever the length of ribbon I had seeing as I was using leftover pieces. I did have a minimum size as I wanted more that two loops so I made sure they were at least 6 inches long.
- To create a mostly uniform loop I used a finger width between the pearl and loop. If they weren't exactly the same size I did not worry about it. I thought it gave it character, plus I've never seen a perfect asymetrical piece of ribbon candy either.
- Every couple of pearls I would knot the fishing line into the ribbon. This would give the ornament some stability that made it way easier to work with.
I would like to take this opportunity to thank Amanda again for hosting another fantastic blog hop! I always enjoy participating and seeing what everyone else does.
Dec 1, 2011
Homemade Holiday Blog Hop
Hello and Welcome to the Handmade Holiday blog hop! I am so happy to have you stop by my humble little blog! If you did not arrive to my blog from the uber talented Becky's blog please return to Amanda's blog to follow the hop in order so that you don't miss any wonderful inspiration from the amazing ladies participating with me!
This year is our second year doing a homemade Christmas in my family. It is something we started last year because we decided to take a family vacation to Jamaica over Christmas and it was done in an effort to save a little money. It ended up being one of my favorite Christmases! I do come from a crafty family so all of the gifts were super creative and had such heartfelt meaning! So much so, that we decided to do it again this year and this blog hop is perfect with that goal! We were challenge by Amanda to create a handmade project using our scrappy stash or tools. It can be a gift, home decor item, food/recipe that somehow uses our scrappy items.
So for this blog hop, I had hard a bit of a hard time because all of the projects I am working on have to be kept under wraps until I can give them to their new owners at Christmas! So I had to come up with an idea just for this blog and something that will be just for me! I have always had a fascination with Christmas candy. I think it's because it reminds me of my beloved Grandmother. I remember bowls and bowls of candy all over her house at Christmas, especially ribbon candy! I went through my stash of ribbons and looked for a bunch of striped short pieces of ribbon that I could use to make my own ribbon candy ornaments.

Using some fishing line and pearl beads I got at my local dollar store I stung together these super cute ornaments for my Christmas tree! I love them! I am actually thinking that I might make a garland or swags for my tree when I have more time and can get some pretty ribbon on sale in large enough quantities to go around my tree!

And now you have your chance to win! I am doing a giveaway to one of you. Simply comment on this post and become a follower. I will do a random draw on Monday morning for all the materials you need to make one of these adorable ornaments and maybe I'll even throw in one I made; make sure to check back then to see if you won.
Now for the next stop on your blog hop, please head on over to very funny and super talented Shanon!
This year is our second year doing a homemade Christmas in my family. It is something we started last year because we decided to take a family vacation to Jamaica over Christmas and it was done in an effort to save a little money. It ended up being one of my favorite Christmases! I do come from a crafty family so all of the gifts were super creative and had such heartfelt meaning! So much so, that we decided to do it again this year and this blog hop is perfect with that goal! We were challenge by Amanda to create a handmade project using our scrappy stash or tools. It can be a gift, home decor item, food/recipe that somehow uses our scrappy items.
So for this blog hop, I had hard a bit of a hard time because all of the projects I am working on have to be kept under wraps until I can give them to their new owners at Christmas! So I had to come up with an idea just for this blog and something that will be just for me! I have always had a fascination with Christmas candy. I think it's because it reminds me of my beloved Grandmother. I remember bowls and bowls of candy all over her house at Christmas, especially ribbon candy! I went through my stash of ribbons and looked for a bunch of striped short pieces of ribbon that I could use to make my own ribbon candy ornaments.

Using some fishing line and pearl beads I got at my local dollar store I stung together these super cute ornaments for my Christmas tree! I love them! I am actually thinking that I might make a garland or swags for my tree when I have more time and can get some pretty ribbon on sale in large enough quantities to go around my tree!

And now you have your chance to win! I am doing a giveaway to one of you. Simply comment on this post and become a follower. I will do a random draw on Monday morning for all the materials you need to make one of these adorable ornaments and maybe I'll even throw in one I made; make sure to check back then to see if you won.
Now for the next stop on your blog hop, please head on over to very funny and super talented Shanon!
Supplies: Embellishments: Ribbons, Pearls, and Fishing Line.
Oct 17, 2011
Blog Hop Winner!
Thank you everyone for all your kind words about my blog hop project! I really appreciate them and enjoyed reading each of them. As promised I have drawn a random number using the Random.Org webiste and the winner is lucky number 10!

Congratulations All About UNC! Please send you mailing info to jenniferdewolfe (at) gmail (dot) com and I will send your package out to you!
I would like to take this opportunity to thank Amanda again for hosting another fantastic blog hop! I always enjoy participating and seeing what everyone else does.

Congratulations All About UNC! Please send you mailing info to jenniferdewolfe (at) gmail (dot) com and I will send your package out to you!
I would like to take this opportunity to thank Amanda again for hosting another fantastic blog hop! I always enjoy participating and seeing what everyone else does.
Oct 13, 2011
One Fall Day + Blog Hop
Hello and Welcome to the Leafing Memories Behind blog hop! I am so happy to have you stop by my humble little blog! If you did not arrive to my blog from the uber talented Ashley's blog please return to Amanda's blog to follow the hop in order so that you don't miss any wonderful inspiration from the amazing ladies participating with me!
The idea for the blog hop this time around is pretty simple this time. The requirement for this project is that it must have leaves (or a leaf) in it in some way shape or form. I went with my go to project, a layout:

I placed my title on the layout but I found it was just floating there, completely disconnected. So I took to my needle and thread and created a swirl effect surrounding my title all the way down to the floating leaf. I then added a little more stitching to the right as well.

For the leaves on my layout I created them myself using felt with stitched veins. It worked out great because I could make them any size I needed, in any color I wanted!

And now you have your chance to win! I am doing a giveaway to one of you. Simply comment on this post and become a follower. I will do a random draw on Monday morning; make sure to check back then to see if you won.
Don't forget about Amanda's giveaway! Take the inspiration we've provided you and create your own project that is leaf inspired. Post it to your blog, gallery or Flickr and share the link here in the Mr Linky widget on Amanda's Blog. You have until the end of day Sunday, Oct 23 to post!
Now for the next stop on your blog hop, please head on over to very funny and super talented Kathy!
The idea for the blog hop this time around is pretty simple this time. The requirement for this project is that it must have leaves (or a leaf) in it in some way shape or form. I went with my go to project, a layout:

I placed my title on the layout but I found it was just floating there, completely disconnected. So I took to my needle and thread and created a swirl effect surrounding my title all the way down to the floating leaf. I then added a little more stitching to the right as well.

For the leaves on my layout I created them myself using felt with stitched veins. It worked out great because I could make them any size I needed, in any color I wanted!

And now you have your chance to win! I am doing a giveaway to one of you. Simply comment on this post and become a follower. I will do a random draw on Monday morning; make sure to check back then to see if you won.
Don't forget about Amanda's giveaway! Take the inspiration we've provided you and create your own project that is leaf inspired. Post it to your blog, gallery or Flickr and share the link here in the Mr Linky widget on Amanda's Blog. You have until the end of day Sunday, Oct 23 to post!
Now for the next stop on your blog hop, please head on over to very funny and super talented Kathy!
Supplies: Patterned Paper: My Mind's Eye - So Sophie Collection; Cardstock: Bazzills; Alphabet Stickers: American Crafts Thickers and Doodlebug; Embellishments: Felt and Embroidery Floss; Inks: Colorbox Chalk Ink; Sketch: Sketches for Scrapbooking Volume 3; Tools: Creative Memories Corner Rounder.
Aug 22, 2011
August Blog Hop Winner!
Thank you everyone for your wonderful comments this weekend on my blog hop layout! You are all way too sweet! I was so excited to see that I also made it to 40 followers because of the blog hop! That is so amazing and because of that I decided that I am going to choose two winners today ... yippee!
So the first winner, chosen by Random.org, is comment #9

Congratulations blsd2scrp! I love that a first time hopper is the winner of my blog hop giveaway! Please send your contact info to jenniferdewolfe(at)gmail(dot)com and I will send your prize out to you!
And the second winner, chosen by Random.org, is comment #20

Congratulations GrammaChurch! You are the winner of the 40 followers giveaway! Please send your contact info to jenniferdewolfe(at)gmail(dot)com and I will send your prize out to you!
Thanks again for all your kind comments and look for another blog hop in October! Have a great day!
So the first winner, chosen by Random.org, is comment #9
Congratulations blsd2scrp! I love that a first time hopper is the winner of my blog hop giveaway! Please send your contact info to jenniferdewolfe(at)gmail(dot)com and I will send your prize out to you!
And the second winner, chosen by Random.org, is comment #20
Congratulations GrammaChurch! You are the winner of the 40 followers giveaway! Please send your contact info to jenniferdewolfe(at)gmail(dot)com and I will send your prize out to you!
Thanks again for all your kind comments and look for another blog hop in October! Have a great day!
Aug 18, 2011
August Blog Hop
Welcome to August Blog Hop! I am so happy to have you stop by my hummble little blog! If you did not arrive to my blog from the uber talented Ashley's blog please return to Amanda's blog to follow the hop in order.
Similar to June's Blog Hop, this blog hop is center around a sketch provided by the uber talented Amanda! Here's the sketch:

This was a great sketch but I did have to make some minor changes to it in order for it to work with the patterned papers I chose. The original dimensions covered too much of my background paper and I really wanted to see the McDonald Lodge ledger more, so everything was shrunk down just a little to work with it.

In Amanda's sketch, she had the title situated on a cardstock/patterned paper block but once again, I didn't want to cover up that much of the star paper, so I omited the block and adhered my title directly to the square block. I also replaced the stitches on the sketch with birds and butterflies on my layout.

Now because I had shrunk quite a bit down, it meant I didn't have as much room at the bottom for all the borders so using a border punch, I punched the starred paper with a border punch and then added some twine to give it a layer look.

I know I made a couple of changes but that is the joy of sketches! you can copy them directly, modify them slightly to fit your needs, or use them as a creative springboard to come up with something completely different. If you are not a user of sketches I highly recommend giving them a try. They are a lot of fun and you will be surprise how inspiring they can be!
So how about a little giveaway? Leave a comment and become a follower and you will be entered to win a fun scrappy prize! I will randomly draw a name on Monday morning so be sure to check back to see if you have won!
Now for the next stop on your blog hop, please head on over to very funny and super talented Kathy!
If you'd like to be entered in the prize for the entire hop, after you've completed a layout based off the sketch, return to Amanda's blog to add your link!
Similar to June's Blog Hop, this blog hop is center around a sketch provided by the uber talented Amanda! Here's the sketch:

This was a great sketch but I did have to make some minor changes to it in order for it to work with the patterned papers I chose. The original dimensions covered too much of my background paper and I really wanted to see the McDonald Lodge ledger more, so everything was shrunk down just a little to work with it.

In Amanda's sketch, she had the title situated on a cardstock/patterned paper block but once again, I didn't want to cover up that much of the star paper, so I omited the block and adhered my title directly to the square block. I also replaced the stitches on the sketch with birds and butterflies on my layout.

Now because I had shrunk quite a bit down, it meant I didn't have as much room at the bottom for all the borders so using a border punch, I punched the starred paper with a border punch and then added some twine to give it a layer look.

I know I made a couple of changes but that is the joy of sketches! you can copy them directly, modify them slightly to fit your needs, or use them as a creative springboard to come up with something completely different. If you are not a user of sketches I highly recommend giving them a try. They are a lot of fun and you will be surprise how inspiring they can be!
So how about a little giveaway? Leave a comment and become a follower and you will be entered to win a fun scrappy prize! I will randomly draw a name on Monday morning so be sure to check back to see if you have won!
Now for the next stop on your blog hop, please head on over to very funny and super talented Kathy!
If you'd like to be entered in the prize for the entire hop, after you've completed a layout based off the sketch, return to Amanda's blog to add your link!
Supplies: Patterned Paper: October Afternoon - Campfire Collection; Alphabet Stickers: Basic Grey - Letter Stickers and October Afternoon - Mini Market; Embellishments: October Afternoon - Campfire Cardstock Stickers, Eyelets, and Twine; Sketch: Amanda Sherman; Tools: EK Success Binding Edge Edger Punch and Cropodile.
Jun 6, 2011
Sketch It To Me Blog Hop Winner!
First off I wanted to say thank you to everyone who left such wonderful comments on my blog this past weekend! I had so much fun participating in this blog hop and really enjoyed working with the sketch to make my layout and card. I'm sure you are all wonder who won the giveaway so without further ado I would like to annouce the winner of the Echo Park Paper is:


Congratulations Beth! Please send your mailing info to jenniferdewolfe (at) gmail (dot) com and I will get it into the mail this week!


Congratulations Beth! Please send your mailing info to jenniferdewolfe (at) gmail (dot) com and I will get it into the mail this week!
Jun 2, 2011
Sketch It To Me Blog Hop
Hello and welcome to the Sketch It To Me blog hop. I am so excited to participate and would like to Thank Amanda for letting me join! I am the last stop on the blog hop and you should of arrived here from Dana's Blog, but if you didn't you can go back to the beginning and start at Amanda's Blog .
Amanda gave us this great one page sketch to work with. We were allowed to interpret it how ever we please so I hope you enjoy my interpretation!

This layout is about my dog Angus. He loves to go to the dog park and play with the big dogs. I personally think it because he thinks he is one too! I cho0se this paper by Echo Park because I love all those trees and thought it fit my dog park theme very well.

So in case you didn't notice, I did do some changes to the sketch. The biggest change I made was to the photo block. I rotated it 90 degrees clockwise as it fit my photos much better. I also shifted everything up slightly so that you could see a row of trees on the bottom of the layout.
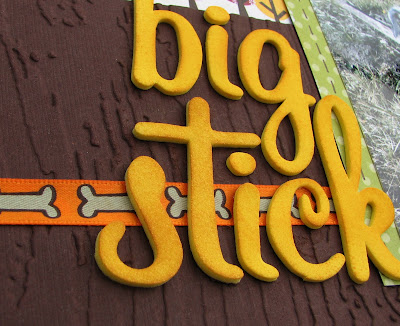
I also switched up the border strips a little. Because my background paper was so busy I wanted my strips to have a calming presence so I used brown cardstock and ribbon. To give my cardstock a little texture and to make it fit better with the park theme, I ran it through my Cuttlebug with a Tim Holtz embossing folder. I tried the title above the border strips, as in the sketch, but it got lost up there. So I moved them down slightly onto the border strip where they had a better chance of standing out. I also added a little bit of ink onto the foam letters to tone down the yellow slightly.

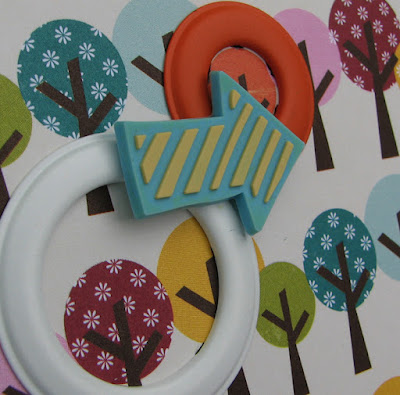
The sketch also had some die cut circles which I replace with these cute little rings that I have had in my stash for as long as I can remember. I think they were made by Making Memories many, many moon ago! On top of them I added some gummie embellishments by Love Elsie. So cool aren't they?!
And that concludes my portion of this hop. I sure hope you enjoyed my post and all the posts by my fellow hoppers! On behalf of us all thank-you for joining us! In fact, as a thank-you, I would like offer a giveaway!
That's right a giveaway!!!
Simply comment on this post and become a follower of my blog and I will randomly draw a name to win an Echo Park paper pack on Monday! I hope you have a wonderful weekend!
Amanda gave us this great one page sketch to work with. We were allowed to interpret it how ever we please so I hope you enjoy my interpretation!

This layout is about my dog Angus. He loves to go to the dog park and play with the big dogs. I personally think it because he thinks he is one too! I cho0se this paper by Echo Park because I love all those trees and thought it fit my dog park theme very well.

So in case you didn't notice, I did do some changes to the sketch. The biggest change I made was to the photo block. I rotated it 90 degrees clockwise as it fit my photos much better. I also shifted everything up slightly so that you could see a row of trees on the bottom of the layout.

I also switched up the border strips a little. Because my background paper was so busy I wanted my strips to have a calming presence so I used brown cardstock and ribbon. To give my cardstock a little texture and to make it fit better with the park theme, I ran it through my Cuttlebug with a Tim Holtz embossing folder. I tried the title above the border strips, as in the sketch, but it got lost up there. So I moved them down slightly onto the border strip where they had a better chance of standing out. I also added a little bit of ink onto the foam letters to tone down the yellow slightly.

The sketch also had some die cut circles which I replace with these cute little rings that I have had in my stash for as long as I can remember. I think they were made by Making Memories many, many moon ago! On top of them I added some gummie embellishments by Love Elsie. So cool aren't they?!

And that concludes my portion of this hop. I sure hope you enjoyed my post and all the posts by my fellow hoppers! On behalf of us all thank-you for joining us! In fact, as a thank-you, I would like offer a giveaway!
That's right a giveaway!!!
Simply comment on this post and become a follower of my blog and I will randomly draw a name to win an Echo Park paper pack on Monday! I hope you have a wonderful weekend!
Supplies: Patterned Paper: Echo Park - Walk In The Park Collection; Cardstock: Bazzils; Alphabet Stickers: American Crafts Thinckers; Embellishments: Ribbon, Making Memories Rings, Love Elsie Gummie Embellishments; Inks: Chalk Box; Sketch: Amanda Sherman; Tools: CuttleBug, Tim Holtz Woodgrain Embossing Folder.
Dec 16, 2010
Holiday Candle & Blog Hop
Hello and welcome to my first ever blog hop I am so excited to participate and would like to Thank Amanda for letting me join! I am the last stop on the blog hop and you should of arrived here from Laurie's Blog, but if you didn't you can go back to the begining and start here at Amanda's Blog .

With the holidays almost here, it's inevitable that at the last moment I will realize I forgot to get a gift for someone. I've done this too many times to count. Well today I want to show you a quick and easy gift you can make with supplied you probably already have in your stash.

You will need a candle, patterned paper, ribbon, a marker in any color doesn't matter, liquid glue, glue gun and some embellishments. First thing you need to do is cut the strips of patterned paper that you will roll into tubes. Measure the height of your candle and this will be how high you will need your tubes to be, my candle was just shy of 4 inches so I cut at 4 inches. Be careful when making this cut that the pattern paper is facing the right direction other wise when you roll the tubes your pattern might go the wrong way. Now you will need to take this cut piece and cut it into 2 inch strips. Now how many strips you will need will depend on how big around your candle is and how small you make your tubes. This candle used 29 tubes. I used various pieces of Basic Grey's Eskimo Kisses collection which made co-ordination a breeze. So now that you have your strips cut, starts the fun part. Take one of your strips and lay it face down in front of you and take a marker out of collection. I used a Zig maker which the 2 inches wrapped around just perfectly, if your marker is different in size you might have to adjust for that. Roll the strip around the marker, not too tight or you might have a hard time sliding off. One thing to be careful of is if your marker is tapered and if it is you will have to play with this to make sure the roll is as even as possible. At the edge apply some liquid glue and hold around the marker until the adhesive is set. I used glossy accents and it took about 20 seconds to set. Repeat this with all your strips until they are all in tubes. Arrange all the tubes in the pattern/order you want to apply them as it will make it a lot easier for work your way through. Now take a hot glue gun and run a bead all the way down the length of the candle and quickly set your first tube in place. Hold it there until the glue cools. Now work your way around the candle until you have gone all the way around. Take a piece of ribbon or tulle and tie it around the candle and embellish as you please.


Please leave a comment telling me what you thought of this post and what you might like to see in the future and I will do a random draw on Dec 20th at noon for a little Christmas RAK for one lucky winner.
Now back to the Blog Hop, along the way, you have been collecting words. The word from my blogs is IT'S. Now if you have followed the blog hop as intended you should have 8 words/phrases. Unscramble them and leave a comment on Amanda's Blog, she will draw a random winner Monday Dec 20.
Thanks for stopping by and I hope you enjoyed the blog hop!
Merry Christmas!
With the holidays almost here, it's inevitable that at the last moment I will realize I forgot to get a gift for someone. I've done this too many times to count. Well today I want to show you a quick and easy gift you can make with supplied you probably already have in your stash.

You will need a candle, patterned paper, ribbon, a marker in any color doesn't matter, liquid glue, glue gun and some embellishments. First thing you need to do is cut the strips of patterned paper that you will roll into tubes. Measure the height of your candle and this will be how high you will need your tubes to be, my candle was just shy of 4 inches so I cut at 4 inches. Be careful when making this cut that the pattern paper is facing the right direction other wise when you roll the tubes your pattern might go the wrong way. Now you will need to take this cut piece and cut it into 2 inch strips. Now how many strips you will need will depend on how big around your candle is and how small you make your tubes. This candle used 29 tubes. I used various pieces of Basic Grey's Eskimo Kisses collection which made co-ordination a breeze. So now that you have your strips cut, starts the fun part. Take one of your strips and lay it face down in front of you and take a marker out of collection. I used a Zig maker which the 2 inches wrapped around just perfectly, if your marker is different in size you might have to adjust for that. Roll the strip around the marker, not too tight or you might have a hard time sliding off. One thing to be careful of is if your marker is tapered and if it is you will have to play with this to make sure the roll is as even as possible. At the edge apply some liquid glue and hold around the marker until the adhesive is set. I used glossy accents and it took about 20 seconds to set. Repeat this with all your strips until they are all in tubes. Arrange all the tubes in the pattern/order you want to apply them as it will make it a lot easier for work your way through. Now take a hot glue gun and run a bead all the way down the length of the candle and quickly set your first tube in place. Hold it there until the glue cools. Now work your way around the candle until you have gone all the way around. Take a piece of ribbon or tulle and tie it around the candle and embellish as you please.


Please leave a comment telling me what you thought of this post and what you might like to see in the future and I will do a random draw on Dec 20th at noon for a little Christmas RAK for one lucky winner.
Now back to the Blog Hop, along the way, you have been collecting words. The word from my blogs is IT'S. Now if you have followed the blog hop as intended you should have 8 words/phrases. Unscramble them and leave a comment on Amanda's Blog, she will draw a random winner Monday Dec 20.
Thanks for stopping by and I hope you enjoyed the blog hop!
Merry Christmas!
Subscribe to:
Posts (Atom)